
 by Anthonny Quérouil
How I use Meteor, Elm and Tailwindcss together
I have worked with Elm last year and honestly it was an great experience. I really liked it and I would like to use Elm in all my new projects. But I also like Meteor and three weeks ago I started using it again. I discovered Meteor in 2015, I gave a talk about it (https://www.youtube.com/watch?v=AxIvfQXTqVo) and it still feels like "Wow!" when you start a project. So in this post I will explain how I make the two work together and how to add Tailwindcss for the UI part (I love Tailwindcss too 😍), from scratch. I will also explain how to link an existing project to Meteor with a Todo app.
Prerequisite
You only need two things:
-
Your favourite IDE (VSCode with the Elm extension fits very well)
-
A browser
You don’t need to install NPM, Node or Mongo. All this stuff is already packaged in Meteor environment.
So to run a NPM command we will use meteor npm xxx, and for Mongo, we will use meteor mongo.
So let’s begin 😁
Meteor
Install Meteor
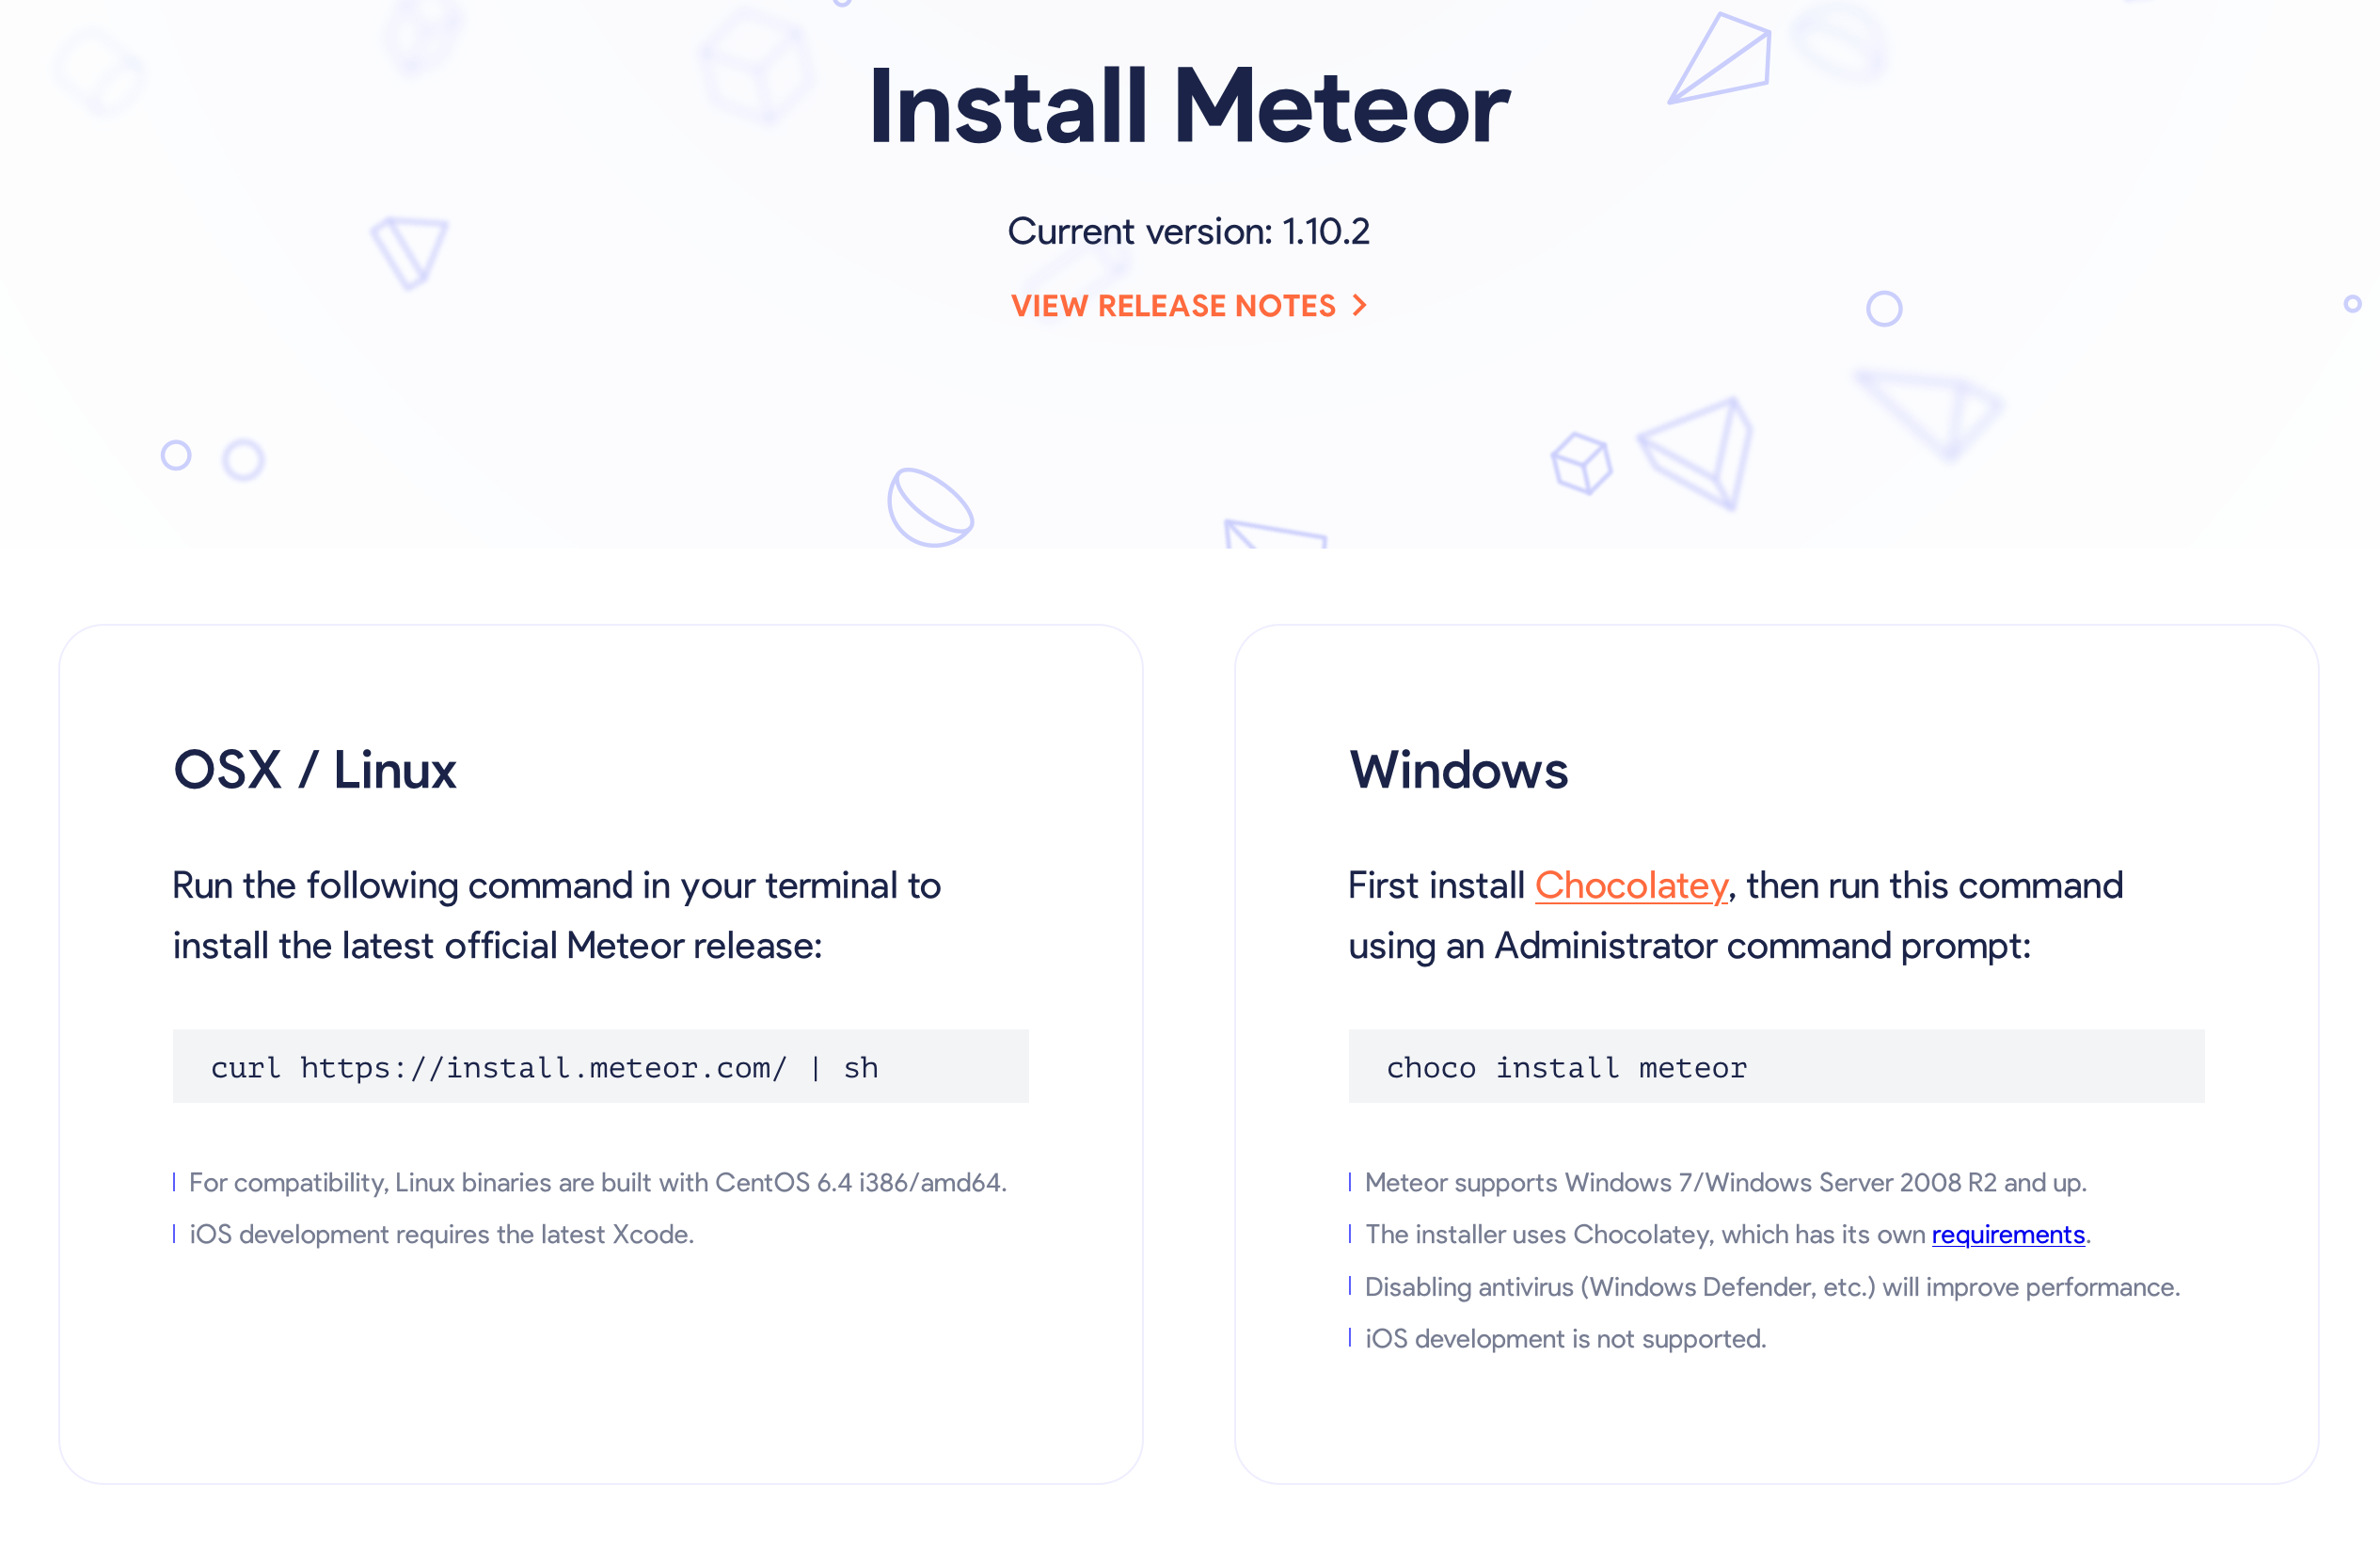
Here are the commands to install Meteor on OSX/Linux and Windows OSX / Linux
# OSX/Linux
curl https://install.meteor.com/ | sh

# Windows
choco install meteor| For more information about the installation, please refer to the official documentation here https://www.meteor.com/install |
Create a project
Let’s start by creating an empty project
meteor create meteor-elm-app --bare
cd meteor-elm-app
This --bare option will create an empty project with static-html instead of blaze and without autopublish and insecure.
| For more information about the command create, follow the link to the documentation |
Add typescript
Adding Typescript is really simple. Just run these two commands
# under meteor-elm-app
meteor add typescript
meteor npm i -D @types/meteor @types/mocha
Create a tsconfig.json under the directory meteor-elm-app
{
    "compilerOptions": {
      /* Basic Options */
      "target": "es2018",
      "module": "esNext",
      "lib": ["esnext", "dom"],
      "allowJs": true,
      "checkJs": false,
      "incremental": false,
      "noEmit": true,

      /* Strict Type-Checking Options */
      "strict": true,
      "noImplicitAny": true,
      "strictNullChecks": true,

      /* Additional Checks */
      "noUnusedLocals": true,
      "noUnusedParameters": true,
      "noImplicitReturns": false,
      "noFallthroughCasesInSwitch": false,

      /* Module Resolution Options */
      "baseUrl": ".",
      "paths": {
        /* Support absolute ~imports/* with a leading '/' */
        "/*": ["*"]
      },
      "moduleResolution": "node",
      "resolveJsonModule": true,
      "types": ["node", "mocha"],
      "esModuleInterop": true,
      "preserveSymlinks": true,
    },
    "exclude": [
      "./.meteor/**",
      "./packages/**"
    ]
}| This configuration comes from the typescript template provided by Meteor. I just removed the support of JSX. |
Create the file structure
| We will setup a simple file structure here. For more complex projects, you should follow the guideline provided by Meteor |
To initialise the file structure, run these commands
# under meteor-elm-app
mkdir client server imports/api
touch client/main.html client/main.ts client/main.css server/main.ts
Your project folder should look like this:
# under meteor-elm-app
❯ tree -I node_modules
.
├── client
│   ├── main.css
│   ├── main.html
│   └── main.ts
├── imports
│   └── api
├── package-lock.json
├── package.json
├── server
│   └── main.ts
└── tsconfig.json

4 directories, 7 files
We will update the package.json file to define the main modules in our Meteor app:
"meteor": {
    "mainModule": {
        "client": "client/main.ts",
        "server": "server/main.ts"
    }
}
At this point your package.json file should be like:
{
  "name": "meteor-elm-app",
  "private": true,
  "scripts": {
    "start": "meteor run"
  },
  "meteor": {
    "mainModule": {
      "client": "client/main.ts",
      "server": "server/main.ts"
    }
  },
  "dependencies": {
    "@babel/runtime": "^7.8.3",
    "meteor-node-stubs": "^1.0.0"
  }
}| if you need more informations about this mainModule options, you can read the content of this pull request |
We now need to add some basic content to the main.html file:
<head>
  <title>meteor-elm-app</title>
</head>

<body>
  <div id="main">Elm app will be here</div>
</body>
Checkpoint
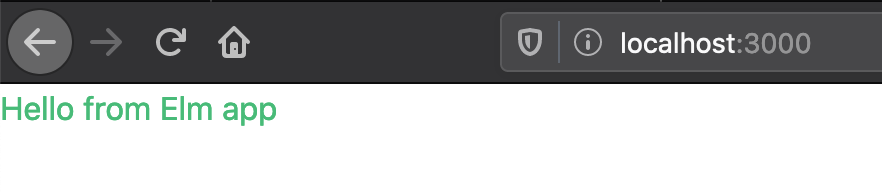
Lets check if everything is OK before starting with Elm. Start your meteor server:
# under meteor-elm-app
meteor
Open http://localhost:3000 on your favorite browser You should see this:

Elm
Install Parcel
We will use Parcel to build our Elm application and we will use the result of this build in our Meteor application
To install Parcel, run this command
meteor npm i -D parcelCreate a Meteor package
This Meteor package will contain our Elm application and we will use this package inside the Meteor application.
We use a Package because it allows us to isolate our Elm application from the rest of the Meteor context. It is also really useful if we want to remove our Elm application or if one we don’t want to use Meteor anymore.
Let’s start by creating some folders:
mkdir -p packages/elm-app/{app,dist}The app folder will contain the sources of our Elm application (Elm, TS and CSS files). The dist folder will contain the result of the build made by Parcel.
Because we will build with Parcel and not with Meteor, we will create a new file at the root of the meteor-elm-app called .meteorignore
#under meteor-elm-app
touch .meteorignore
Then add this line inside this new file:
/packages/elm-app/app/**/*Because we don’t want to push the dist and the elm-stuff folders on our repository, we will add them in the .gitignore located under the folder meteor-elm-app
dist
elm-stuff
Now, let’s create a package.js file in our package:
#under meteor-elm-app/packages/elm-app
touch package.js
And add the following content in this file:
Package.describe({
    name: 'elm-app',
    version: '1.0.0',
    summary: 'elm app',
    documentation: 'add your elm app into meteor',
});

Package.onUse(function (api) {
    api.versionsFrom('1.10.2');
    api.use('modules');
    api.addFiles('dist/elm-app.css', 'client');
    api.mainModule('dist/elm-app.js', 'client');
});
Package.describe says that our package:
-
is called
elm-app, -
is in version
1.0.0
Package.onUse says that our package:
-
is implemented to be use with Meteor
1.10.2, -
uses the
modulespackage, so we will be able to useimport {} from '', -
will add the
dist/elm-app.cssfile in the client when it will be loaded, -
have a main js file for this package called
dist/elm-app.js.
If you are using elm-css and if you don’t need specific css classes in your app, you can remove api.addFiles('dist/elm-app.css', 'client'); from the package.js file.
| For more informations about the Package.js file, see the documentation |
Create the app
We will create our Elm application under the folder packages/elm-app/app.
We need to install Elm:
meteor npm i -D elm elm-format| elm-format is not mandatory but you should use it with your IDE to format on save and to avoid problem at compile time |
Then we will initialise our app with the following command:
#under meteor-elm-app/packages/elm-app/app
meteor npx elm init
Validate the creation of the elm.json file and we are good 👍.
At this step, your folder should be like this:
#under meteor-elm-app
❯ tree -I 'node_modules|.meteor' -a
.
├── .gitignore
├── .meteorignore
├── client
│   ├── main.css
│   ├── main.html
│   └── main.ts
├── imports
│   └── api
├── package-lock.json
├── package.json
├── packages
│   └── elm-app
│       ├── app
│       │   ├── elm.json
│       │   └── src
│       ├── dist
│       └── package.js
├── server
│   └── main.ts
└── tsconfig.json

9 directories, 11 files
In a first time, we will create a simple Elm application.
Create a Main.elm file inside the folder packages/elm-app/app/src with this content:
module Main exposing(main)

import Browser
import Html exposing (Html, text)

type alias Model = String

main : Program () Model msg
main =
    Browser.element
        { init = init
        , view = view
        , update = update
        , subscriptions = subscriptions
        }

init: () -> (Model, Cmd msg)
init _ =
    ("Hello from Elm app", Cmd.none)

view: Model -> Html msg
view model =
    text model

update: msg -> Model -> (Model, Cmd msg)
update _ model =
    (model, Cmd.none)

subscriptions : Model -> Sub msg
subscriptions _ =
    Sub.none
The CSS main file
In the folder meteor-elm-app/packages/elm-app/app, create an empty main.scss SCSS file (or CSS if you prefer) that we will use later to add some style in our Elm application.
NB: if you use elm-css and you don’t need a stylesheet, skip this step and remove the line api.addFiles('dist/elm-app.css', 'client'); in the package.js file
The Package mainModule
In the folder meteor-elm-app/packages/elm-app/app, create a file index.ts that will mount our Elm application and export the ports.
A simple version could be:
import './main.scss'
const { Elm } = require('./src/Main.elm')

export const init = (configuration: any) => {
    const app = Elm.Main.init(configuration)
    return app.ports
}
But because we want to Type things as much as possible, let’s create this index.ts like this:
import './main.scss'
const { Elm } = require('./src/Main.elm')

interface Flags {}

export interface Configuration {
    node: HTMLElement | null,
    flags: Flags
}

export interface Ports {}

export const init: (configuration: Configuration) => Ports = (configuration) => {
    const app = Elm.Main.init(configuration)
    return app.ports
}
With this definition, when we will need some flags or some ports, we will add the new stuff in our interface and the client will have to implement them.
| If you are using CSS instead of SCSS then update the file import accordingly |
Build with Parcel
Let’s create a build script in our package.json file:
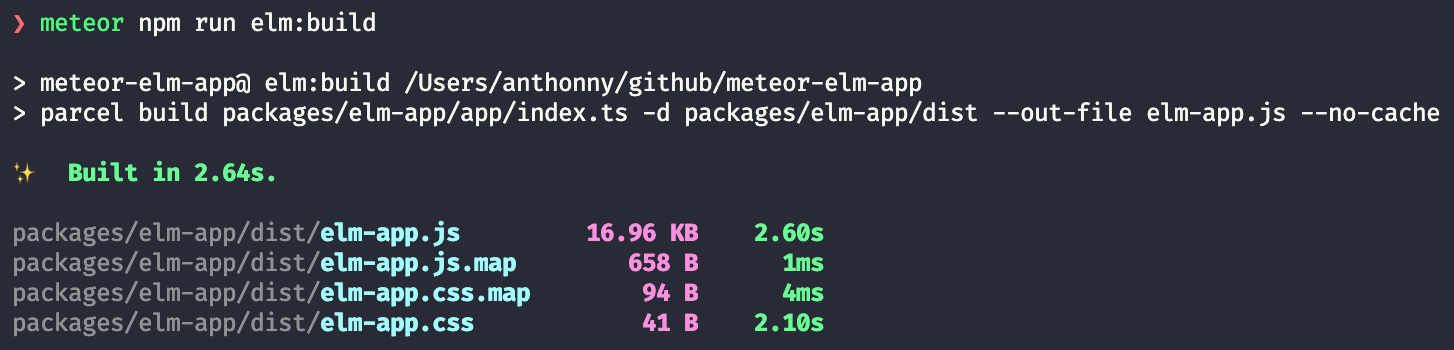
"elm:build": "parcel build packages/elm-app/app/index.ts -d packages/elm-app/dist --out-file elm-app.js --no-cache",This script will build our application in a file elm-app.js (and elm-app.css) and put it in the folder packages/elm-app/dist (the one we added in our .gitignore)
We can test our script
#under meteor-elm-app
meteor npm run elm:build
If everything is ok, you should see these lines:
Add our package to Meteor
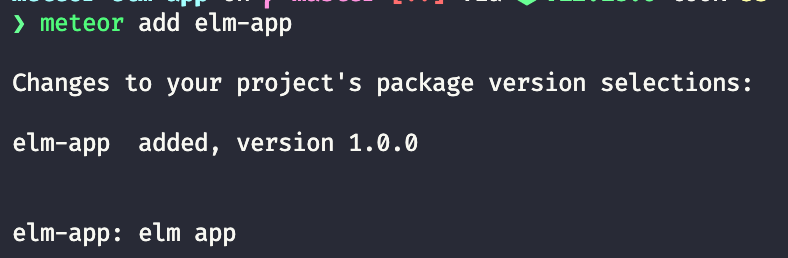
Now that we have a package, we have to add it in our Meteor configuration.
| you must have run the previous build command before adding the package because without a dist folder, you will not be able to add it. |
Execute this command to add the package
#under meteor-elm-app
meteor add elm-app
You should see
Post install
To avoid to have to compile manually each time someone clone the repository, we will add a postinstall script in the package.json file:
"postinstall": "meteor npm run elm:build",Use the Elm application in our Meteor client
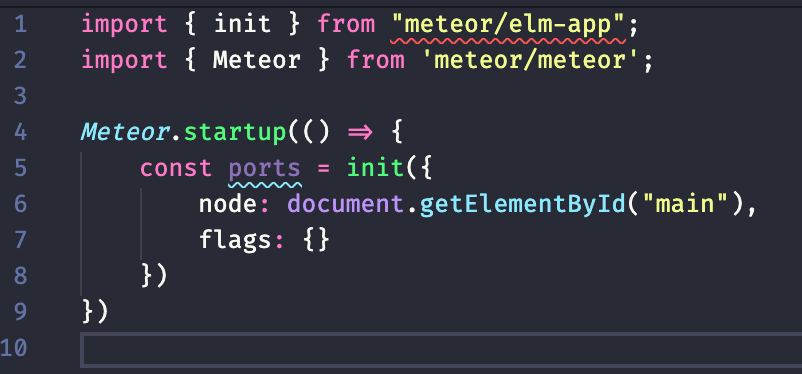
Now that we have our Elm application, it is time to import it in the client side of our Meteor application
In the client/main.ts file, add the following code:
import { init } from "meteor/elm-app";
import { Meteor } from 'meteor/meteor';

Meteor.startup(() => {
    const ports = init({
        node: document.getElementById("main"),
        flags: {}
    })
})
In this code, we import the init function from the package meteor/elm-app which is the package we have just created (you can see it in the file .meteor/packages).
Then we call it to mount our Elm application on the node document.getElementById("main") (the one we have created in the main.html file)
Now, if you start your meteor application by running the meteor command, on http://localhost:3000 you should see:

But…
The typing is not good
You should see that your import is underlined in red:
To fix that, we will add a declaration file:
#under meteor-elm-app
mkdir -p types/meteor
touch types/meteor/elm-app.d.ts
And add the following content
declare module 'meteor/elm-app' {
    export const init: (
        configuration: import('/packages/elm-app/app').Configuration,
    ) => import('/packages/elm-app/app').Ports;
}Live Reload
Because we don’t want to build manually our Elm application each time we make a change, we will setup the live reload
We will install some packages to help us
#under meteor-elm-app
meteor npm i -D concurrently wait-on rimraf
Then we will create an new script in our package.json file:
"elm:watch": "parcel watch packages/elm-app/app/index.ts -d packages/elm-app/dist --out-file elm-app.js",With elm:watch, parcel will rebuild our app each time we make a change in Elm, TS or SCSS files under the folder packages/elm-app/app.
And because parcel watch create a .cache folder, we will add it to the .gitignore file.
The content of your .gitignore should be like this:
node_modules/
dist
elm-stuff
.cache
Now to run parcel and meteor in parallel, we will update the package.json file.
We will rename the script start to meteor:run, and redefine the script start:
"meteor:run": "meteor run",
"start": "rimraf \"./packages/elm-app/dist/*\" && concurrently -n \"parcel,meteor\" -c \"magenta,green\" \"meteor npm run elm:watch\" \"wait-on ./packages/elm-app/dist/elm-app.js && meteor npm run meteor:run\"",
The script start call rimraf to clean the dist folder, then we call concurrently to run two tasks:
-
the
parcelone, that will be log inmagentaand its command ismeteor npm run elm:watch -
the
meteorone, that will be log ingreenand its command iswait-on ./packages/elm-app/dist/elm-app.js && meteor npm run meteor:run(thewait-oncommand is use to wait the build from Parcel)
Now each time we will change our content under packages/elm-app/app, Parcel will rebuild incrementally our application and update the content under the dist folder, so Meteor will detect a change and refresh the main application.
You can now start your application by running:
#under meteor-elm-app
meteor npm start
You can make some changes in your Main.elm file and see that everything will automatically refresh in your browser.
Tailwindcss
Tailwindcss is a npm package, so we will install it like this
meteor npm i -D tailwindcss| For more informations about Tailwindcss, see the documentation |
We need to initialize Tailwincss:
#under meteor-elm-app/packages/elm-app/app
meteor npx tailwindcss init
This command will generate a file called tailwind.config.js
We can now edit the file main.scss inside our app (packages/elm-app/app/main.scss) to use Tailwindcss
@tailwind base;
@tailwind components;
@tailwind utilities;
We will configure postcss to use autoprefixer and the tailwind.config.js file.
#under meteor-elm-app/packages/elm-app/app
touch postcss.config.js
And add this content to this file
const path = require("path");

module.exports = {
  plugins: [
    require("tailwindcss")(path.join(__dirname, "tailwind.config.js")),
    require("autoprefixer"),
  ],
};
We can now edit our Main.elm to add a CSS class (text-green-500) from Tailwindcss:
view: Model -> Html msg
view model =
    div [class "text-green-500"] [text model]
Then if you (re)start your server, you should see this:
The Todos application
It is really awesome right? What? You don’t want to use Meteor just to expose static file? Hmm ok, let’s go with the Todos application
Because the goal of this post is not to learn how to code in Elm, we will start with an application I wrote for the occasion.
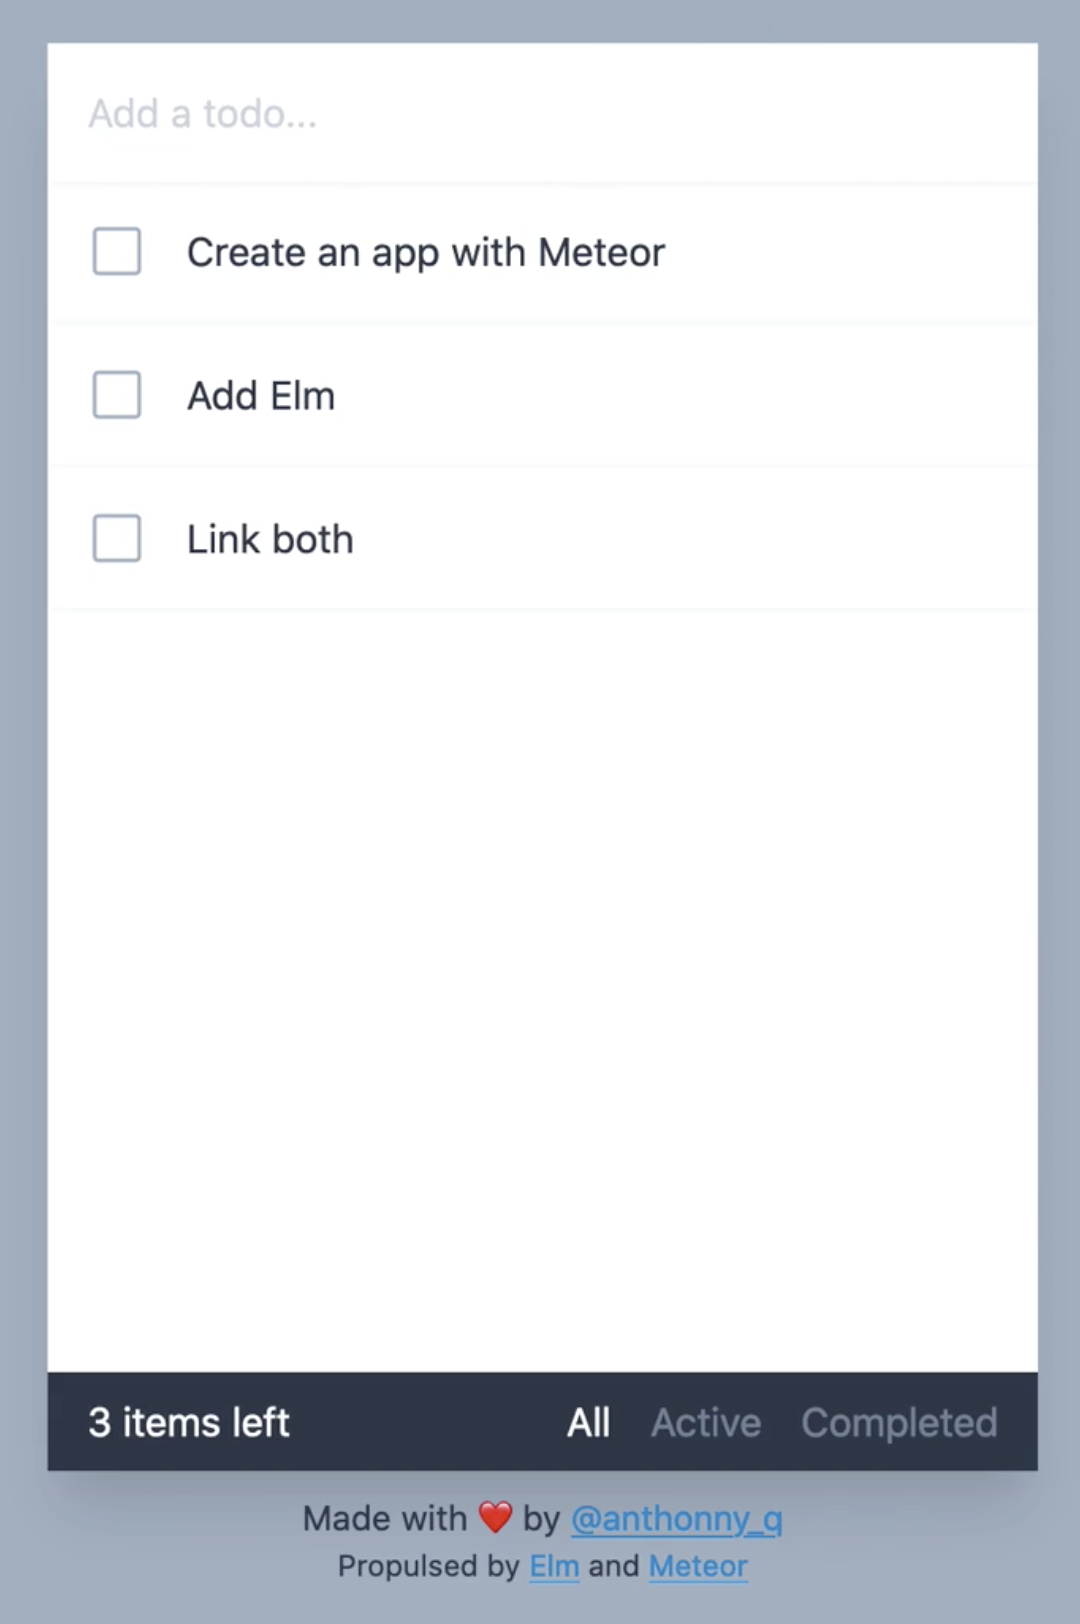
This application is not linked with Meteor yet, there is no ports defined. The goal is to save each Todo in MongoDB and to be able to sync two browser.
Update the Main.elm
Replace the content of the Main.elm file with this gist
We will need to add elm/svg:
#under meteor-elm-app/packages/elm-app/app
meteor npx elm install elm/svg
Then start your application
meteor npm startYou can try the application, actually we can:
-
Add a Todo
-
Switch the status of a Todo
-
Filter Todos by status
We will keep the filtering part in the client, but we want to:
-
Load Todos from MongoDB
-
Save new Todos in MongoDB
-
Switch the status and save it in MongoDB
But let’s start with the backend
Define the Todos collection and methods
Under the folder meteor-elm-app/imports/api, create a file todos.ts.
In this file we will define what is a Todo, and create the collection:
import { Mongo } from "meteor/mongo";
import { Meteor } from "meteor/meteor";

export interface Todo {
  _id?: string;
  value: string;
  status: "checked" | "unchecked";
  createdAt: Date;
}

export const TodosCollection = new Mongo.Collection<Todo>("todos");
Then in the same file, we will add two Meteor methods, one to add a Todo and another to switch the status of Todo with its ID:
Meteor.methods({
  "todos.addTodo"(value: string) {
    if (value !== "") {
      TodosCollection.insert({
        value,
        status: "unchecked",
        createdAt: new Date(),
      });
    }
  },
  "todos.toggleStatus"(todoId: string) {
    const todo = TodosCollection.findOne({ _id: todoId });
    if (!todo) {
      throw new Meteor.Error("Todo not found");
    }

    const newStatus = todo.status === "checked" ? "unchecked" : "checked";

    TodosCollection.update({ _id: todoId }, { $set: { status: newStatus } });
  },
});
And at the end of the file, we will publish our collection on the server side:
if (Meteor.isServer) {
  Meteor.publish("todos", function todos() {
    return TodosCollection.find({}, { sort: { createdAt: -1 } });
  });
}
Finally we need to import this file in the file server/main.ts:
import "/imports/api/todos";The server side in now ready.
Add ports to the Elm application
We will start by installing elm/json and NoRedInk/elm-json-decode-pipeline to decode our Todos:
#under meteor-elm-app/packages/elm-app/app
meteor npx elm install elm/json
meteor npx elm install NoRedInk/elm-json-decode-pipeline
So we will create 3 ports:
-
addTodo:
port addTodo : String → Cmd msg -
toggleStatus:
port toggleStatus : String → Cmd msg -
receiveTodos:
port receiveTodos : (Decode.Value → msg) → Sub msg
Let’s put these port at the end of our Main.elm file:
port module Main exposing(main)

import Json.Decode as Decode
import Json.Decode.Pipeline exposing (required)

...

port addTodo : String -> Cmd msg

port toggleStatus : String -> Cmd msg

port receiveTodos : (Decode.Value -> msg) -> Sub msg
We have to change the type of the Todo.id to use a String because of the id in Mongo:
type alias Todo =
    { id : String
    , value : String
    , status : TodoStatus
    }

type Msg
    = InputChanged String
    | AddTodo
    | ToggleStatus String -- ToggleStatus now need a String not a Int
    | FilterBy Filter
We need a new variant ReceiveTodos (List Todo) for Msg to receive todos:
type Msg
    = InputChanged String
    | AddTodo
    | ToggleStatus String
    | FilterBy Filter
    | ReceiveTodos (List Todo)
We also change the update function because we will not update the todos list anymore.
We will get the one we will receive from the port receiveTodos
update : Msg -> Model -> ( Model, Cmd Msg )
update msg model =
    case msg of
        InputChanged value ->
            ( { model | todo = value }, Cmd.none )

        AddTodo ->
            if String.isEmpty (String.trim model.todo) then
                ( model, Cmd.none )

            else
                ( { model | todo = "" }, addTodo model.todo )

        ToggleStatus todoId ->
            ( model, toggleStatus todoId )

        FilterBy selectedFilter ->
            ( { model | filter = selectedFilter }, Cmd.none )

        ReceiveTodos todos ->
            ( { model | todos = todos }, Cmd.none )
To finish with the Elm part, we need a subscription and some decoders to receive our Todos:
subscriptions : Model -> Sub Msg
subscriptions _ =
    receiveTodos
        (\value ->
            Decode.decodeValue decodeTodos value
                |> Result.withDefault []
                |> ReceiveTodos
        )


decodeTodo : Decode.Decoder Todo
decodeTodo =
    Decode.succeed Todo
        |> required "id" Decode.string
        |> required "value" Decode.string
        |> required "status" decodeStatus


decodeStatus : Decode.Decoder TodoStatus
decodeStatus =
    Decode.string
        |> Decode.andThen
            (\status ->
                case status of
                    "checked" ->
                        Decode.succeed Checked

                    _ ->
                        Decode.succeed Unchecked
            )


decodeTodos : Decode.Decoder (List Todo)
decodeTodos =
    Decode.list decodeTodo
If you remember, we have defined an interface Ports in the file meteor-elm-app/packages/elm-app/app/index.ts.
It is time to add some definitions:
interface Todo {
  id: string;
  value: string;
  status: "checked" | "unchecked";
}

export interface Ports {
  addTodo?: {
    subscribe: (fn: (todo: string) => void) => void;
  };
  toggleStatus?: {
    subscribe: (fn: (todoId: string) => void) => void;
  };
  receiveTodos?: {
    send: (todos: Todo[]) => void;
  };
}
Link ports to Meteor.methods and subscriptions
We have some piece of code in Elm and some piece of code in the server side. Now we need to link them together, and we will do that in the file client/main.ts
We will need to import our TodosCollection and the Meteor Tracker
import { Tracker } from "meteor/tracker";
import { TodosCollection } from "/imports/api/todos";
Then we will subscribe to the output ports:
  ports.addTodo?.subscribe((todo) => {
    Meteor.call("todos.addTodo", todo, (err: Error) => {
      if (err) {
        // Maybe we should pass this error to Elm
        console.log("error", err);
        return;
      }
    });
  });

  ports.toggleStatus?.subscribe((todoId) => {
    Meteor.call("todos.toggleStatus", todoId, (err: Error) => {
      if (err) {
        // Maybe we should pass this error to Elm
        console.log("error", err);
        return;
      }
    });
  });
Here each time addTodo is called from Elm, we add a new Todo with a Meteor.call, same for the toggleStatus.
| Of course we should manage the error, maybe it could be a good exercice 😁 |
Finally we need to send todos everytime the collection change.
To do that, we use Tracker.autorun that will run the callback when necessary.
  // We use the Tracker.autorun to send todos each time the fetch result
  // changes
  Tracker.autorun(() => {
    // Maybe one day we will need to manage the subscription
    const subscription = Meteor.subscribe("todos");

    const todos = TodosCollection.find({}, { sort: { createdAt: 1 } }).fetch();

    ports.receiveTodos?.send(
      todos.map((todo) => ({
        id: todo._id || "",
        value: todo.value,
        status: todo.status,
      }))
    );
  });
Now you can restart your server, open two browsers on http://localhost:3000 and see that everything is saved and sync 👏.
Conclusion
I hope you enjoyed this content as much as I enjoyed writing it. Three weeks ago I was sad because I could not use Meteor with Elm, so I started using it with React and Typescript 😳.
Today, I dropped React and I use Elm again and it is really pleasant.
If you liked this post, do not hesitate to share it on your favorite social networks and if you are interested by this kind of content, you can follow me on twitter @anthonny_q.
If you have any feedbacks, comments are open and you can find the sources of the project here https://github.com/anthonny/meteor-elm-todos.
Special thanks to ni-ko-o-kin, as I was very inspired by his post.
Big thanks to Yann Danthu for the review of this post 😘.